

How to drill ceramic tile and glass without cracking comes down to four controls: identify the surface, choose the correct bit diameter, switch hammer action off, and let a sharp carbide tip work at low speed with light pressure. That sounds basic, but it is exactly where bathroom second-fix work goes wrong. One rushed fixing hole can chip a finished tile, wander away from the mark, or turn a straightforward accessory installation into a costly replacement job.
Quick Shop: Krobahn Tile and Glass Drill Bits
These cross-tip bits are for glass, mirrors and ordinary tiles. Krobahn specifies low RPM, light pressure and a water-based coolant, with hammer action switched off. They are not intended for extra-hard tiles; use a suitable diamond tile bit instead when the material demands it.

Krobahn 6mm x 76mm Tile and Glass Drill Bit
A practical diameter for smaller wall plugs and bathroom accessory fixings. The quarter-inch hex shank helps resist slipping in the chuck, while the four-point tungsten carbide head is designed to start cleanly on glass, mirror and tile.
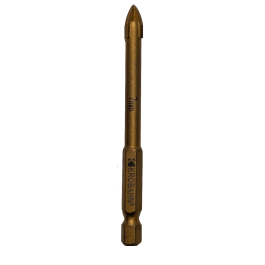
Krobahn 7mm x 76mm Tile and Glass Drill Bit
The useful middle size when the specified fixing needs a 7mm hole. It uses the same controlled cross-tip approach and avoids the poor grip that can result from opening a smaller specified fixing hole to 8mm.

Krobahn 8mm x 78mm Tile and Glass Drill Bit
For fittings designed around an 8mm plug or anchor. The spear-point tungsten carbide tip is made for clear, controlled cutting in glass, mirror and ceramic surfaces when used at low speed with coolant.
Browse APM's drill bits collection for other materials and hole sizes.
How to Drill Ceramic Tile and Glass Without Cracking: Check the Surface First
Do not assume every tile drills the same way. A standard glazed ceramic wall tile is not the same proposition as dense porcelain, stone, or an extra-hard floor tile. Krobahn's manufacturer guidance for its cross-tip tile and glass range specifically says the bits are suitable for glass, mirrors and tiles, but not for extra-hard tiles. If the bit is polishing the surface without progressing, glowing with heat, or needing heavy pressure, stop. More force is not the answer; it usually means the bit and material are mismatched.
Before drilling, confirm what is behind the finish. Use the appropriate detection procedure for concealed cables and pipework, check both sides of the wall where possible, and avoid relying on an old fixing layout as proof that the new point is clear. In a bathroom, also consider waterproofing layers: unnecessary holes through a wet-area system create a sealing detail that must be handled correctly.
Choose the Hole Size From the Fixing, Not by Guesswork
The plug, anchor or proprietary fixing determines the hole diameter. Read the fixing manufacturer's instructions and measure when the packaging is unclear. Do not automatically reach for an 8mm bit because the fitting looks substantial. An oversized hole reduces the grip of an ordinary wall plug; an undersized hole encourages installers to force the plug, damage the tile edge, or enlarge the hole badly by rocking the drill.
For a fixing that explicitly calls for 6mm, use the Krobahn 6mm x 76mm Tile and Glass Drill Bit. Where the fixing schedule states 7mm, use the Krobahn 7mm x 76mm Tile and Glass Drill Bit. For a genuine 8mm requirement, use the Krobahn 8mm x 78mm Tile and Glass Drill Bit. The point is not to buy every size; it is to match the bit to the fixing that is carrying the load.
Mark the Hole and Stop the Bit Wandering
Set out the fixing properly before the drill comes out. Use a level and measure from reliable edges, then check that the accessory still clears grout lines, trims and adjacent fittings. Whenever the fitting allows it, avoid drilling too close to a tile edge or corner, where the risk of cracking is higher.
A cross-tip or spear-point bit is designed to locate more positively than a conventional twist drill, but it still needs a controlled start. Hold the drill square to the surface and begin at very low speed. If the finish is especially slick, a small piece of suitable masking tape can help make the mark visible and reduce initial skating; it does not replace correct pressure or a sharp bit. Never strike the glazed face with a centre punch.
How to Drill Ceramic Tile and Glass Without Cracking: Low RPM, Light Pressure, No Hammer
Krobahn's instructions are direct: use low RPM and light pressure, apply a water-based coolant for best results and wear resistance, and do not use hammer action. Hammer mode can shock the glaze and tile body before the bit has made a clean path. Heavy pressure creates the same problem in a different way, loading a small area and producing excess heat.
Start slowly until the carbide head has established a shallow seat. Keep the drill square and allow the cutting edges to work. Maintain cooling without flooding electrical equipment or creating an uncontrolled run-off hazard. A helper with a controlled spray or sponge can be useful, provided the work area, drill and supply arrangements remain safe. Withdraw the bit periodically to clear debris and check temperature. If progress slows sharply, inspect the tip instead of leaning harder on the drill.
Change Technique After the Tile Is Penetrated
The tile bit's job is to pass cleanly through the finished surface. What happens next depends on the substrate. Once through the tile, stop and assess whether the backing is masonry, plasterboard, timber, cement board or another system. Change to the correct bit and fixing method for that substrate. Keep hammer action off until the tile is fully cleared; even then, only use it if the backing material and chosen drill bit require it.
Do not let the masonry bit hammer against the tile edge. That can chip the exit of the hole or create a crack hidden behind the fitting. Keep the hole square, control depth, and remove dust before inserting the specified fixing. In wet areas, complete any sealing detail required by the waterproofing or accessory manufacturer rather than relying on the fitting plate to hide the penetration.
Drilling Glass Needs Even More Control
Glass drilling is not a casual extension of tile drilling. Confirm that the panel is suitable for site drilling; toughened glass must not be drilled after toughening. Support the work correctly, keep well away from edges and existing holes, use coolant, and apply very light pressure. If the glass type or installation restrictions are uncertain, stop and refer the work to a specialist rather than experimenting on the finished panel.
For suitable drillable glass, the same fundamentals apply: no hammer action, low speed, stable alignment and continuous control of heat. The cross-tip Krobahn range is manufacturer-listed for glass and mirrors, but that does not override the glass supplier's instructions or make every installed panel drillable.
Common Failure Modes on Site
- The bit skates off the mark: speed is too high, the drill is not square, or the tip is worn.
- The glaze chips immediately: hammer action may be on, pressure is excessive, or the start is uncontrolled.
- The bit gets hot but makes little progress: stop and check material compatibility, cooling and tip condition.
- The wall plug spins: the hole may be oversized, dusty, or paired with the wrong fixing for the substrate.
- The tile cracks as the screw tightens: the fixing may be pulling unevenly, the hole may be too close to an edge, or the screw has been overtightened.
Trade Counter Checklist
- Identify ceramic tile, glass, mirror, porcelain or stone before selecting the bit.
- Confirm the fixing manufacturer's required hole diameter.
- Check behind the drilling point for services and waterproofing details.
- Use a sharp, suitable bit; switch hammer action off.
- Start at low RPM with light pressure and controlled water-based cooling.
- Change bit and method to suit the substrate after clearing the tile.
- Clean the hole, fit the specified anchor and avoid overtightening.
Need the correct bit size before the next bathroom or kitchen callout? Visit APM Plumbing & Electrical at 24 Western Avenue, Acton, London W3 7TZ, or call 020 8702 8080. Check the drill bits collection online before travelling.
Leave a comment